

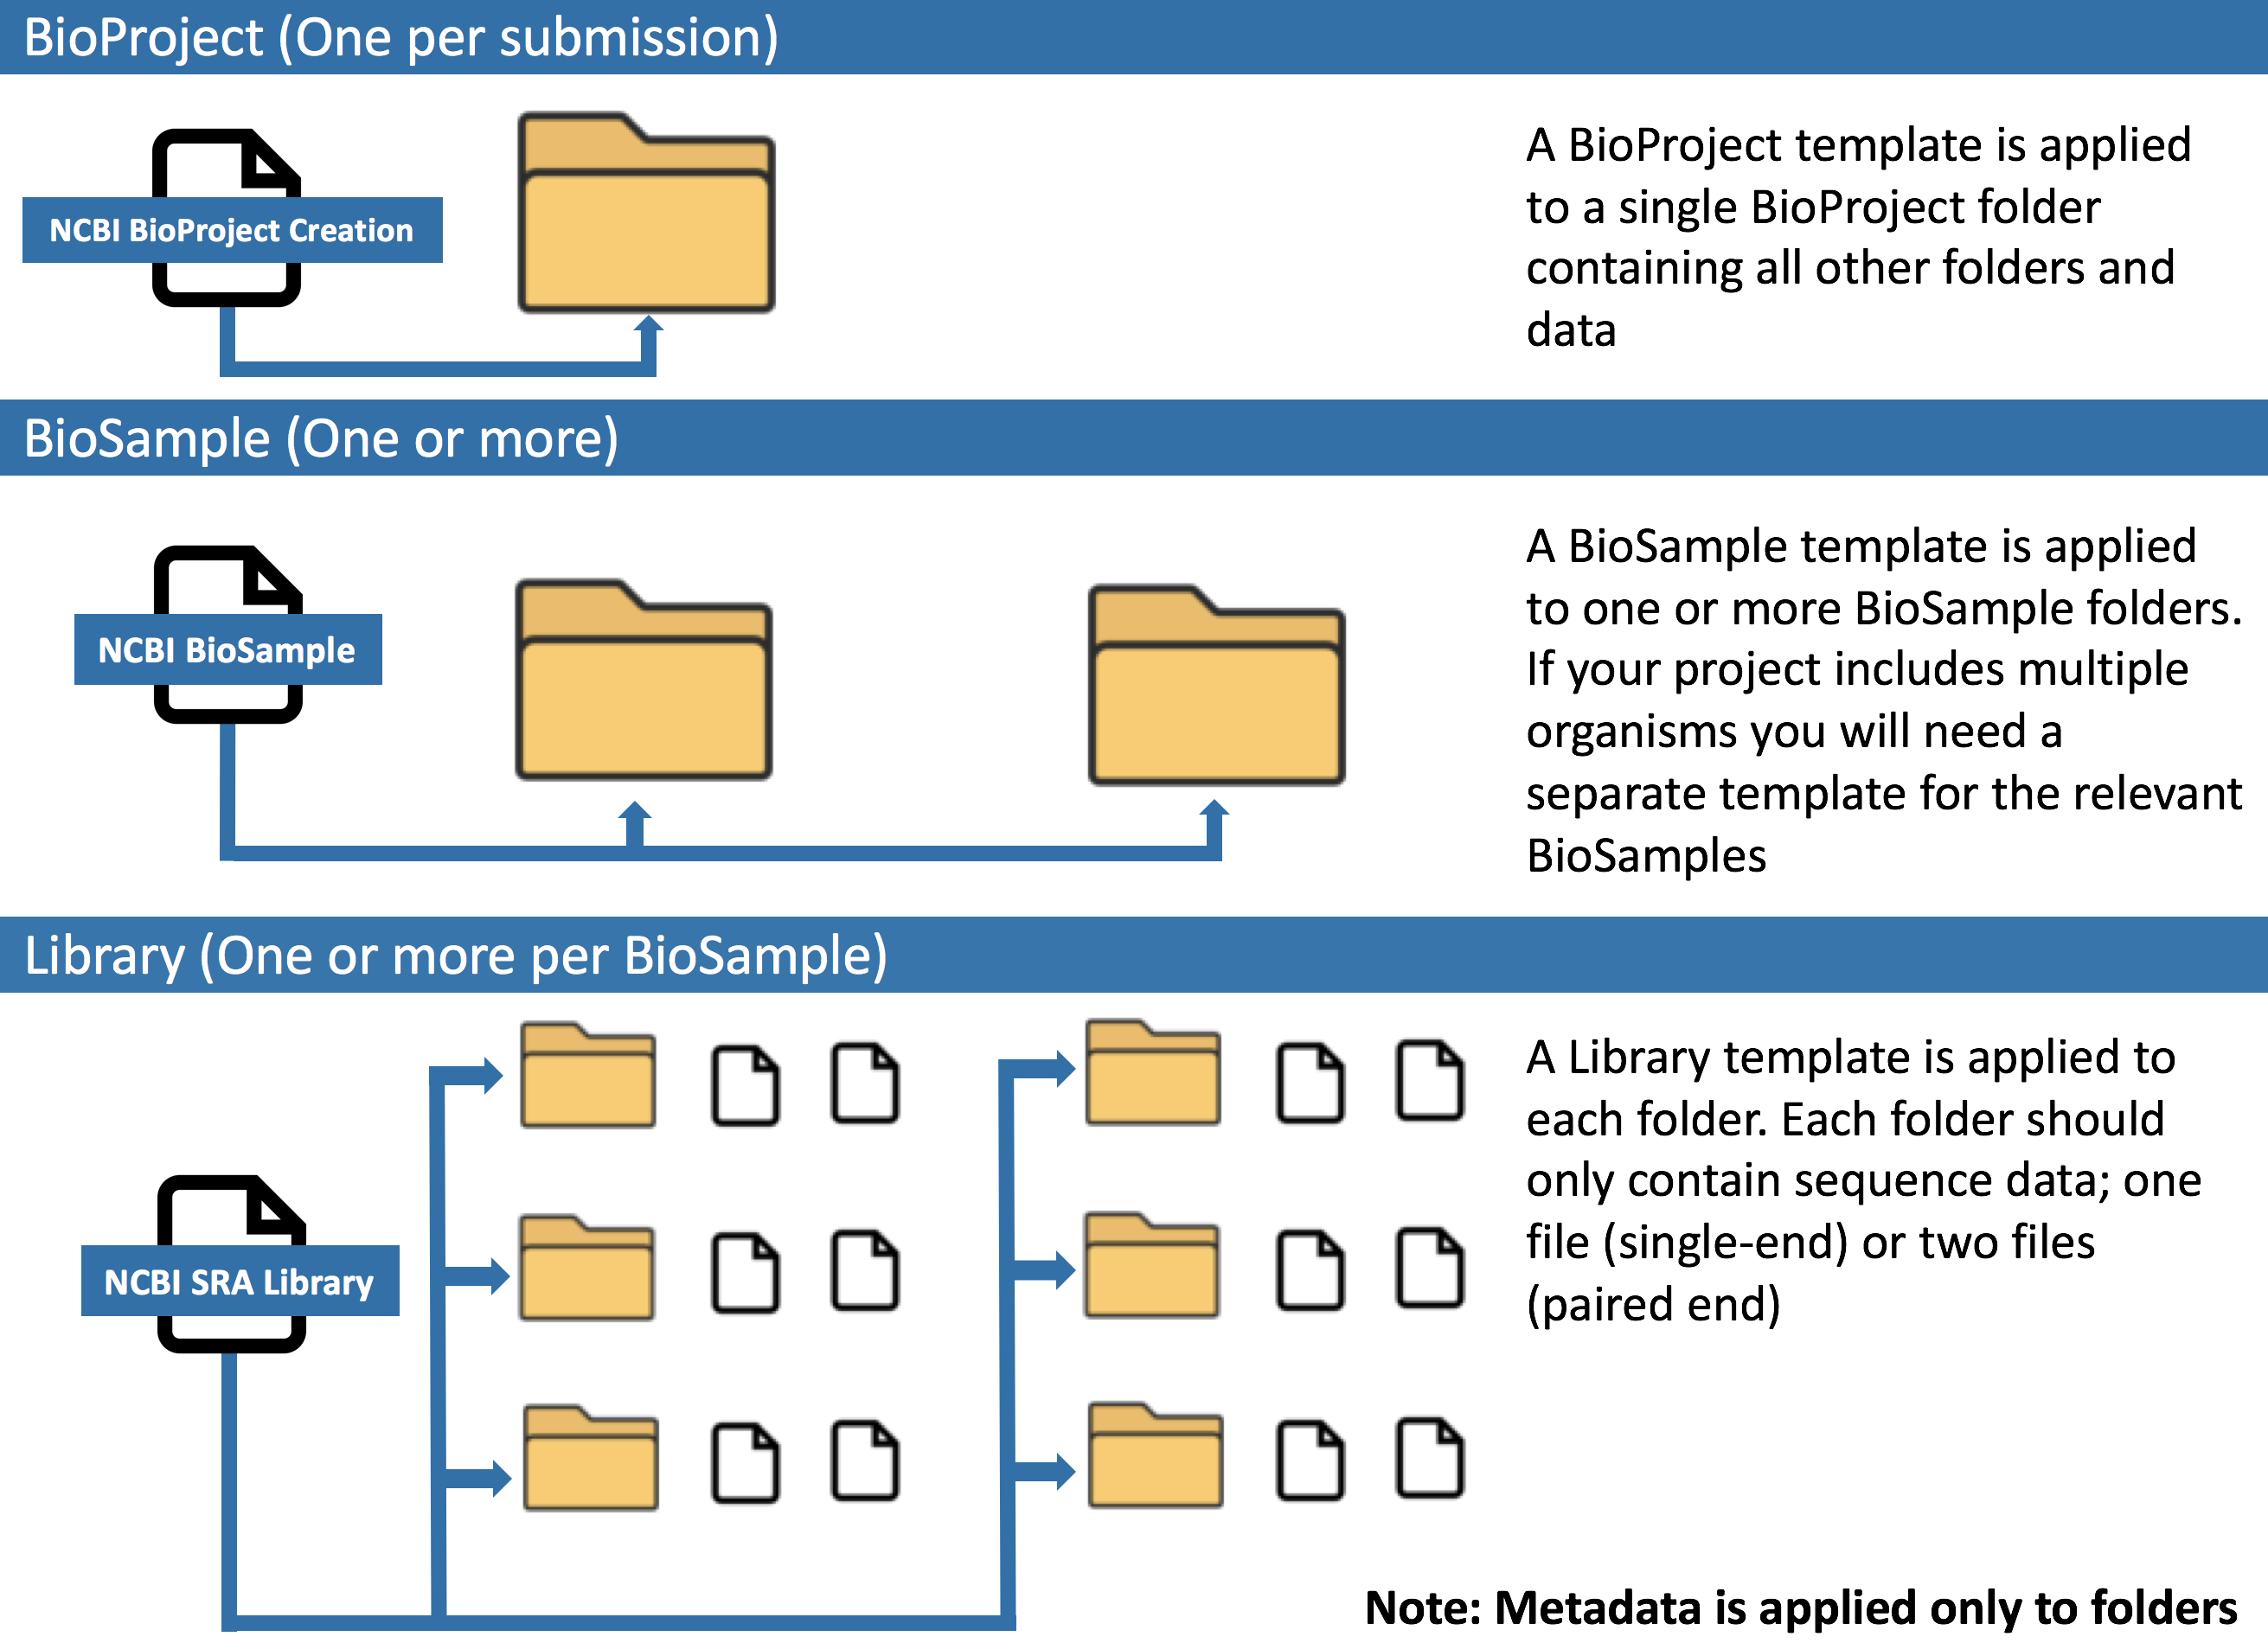
Record metadata and associate with SRA submission
In this section, you will complete 3 metadata templates and associate these metadata with your submission.
- BioProject: Metadata describing the overall project
- BioSample: Metadata describing the source materials sampled
- Library: Metadata describing the sequencing runs
Warning
The metadata templates are defined by NCBI. Each field must be completed exactly as described. Any typos or invalid entries will cause your submission to be rejected.
I. Complete BioProject Metadata Template
We will complete the BioProject Creation template to begin a new submission. You can download a completed example template here
Login to the CyVerse Discovery Environment
Click on Data to open a Data Window, and from the “Metadata” menu select ‘Download Template.’ Select the ‘NCBI BioProject Creation’ and click ‘OK’ to download.
Tip
The download will contain two compressed (.zip) CSV files:
- blank.csv: This is the template to complete
- guide.csv: These are the NCBI specified instructions for the template On your local computer
You can edit the blank.csv template using any spreadsheet editor such as Excel
Complete the metadata template according to the instructions in the guide; save the metadata file as a .csv file (for Excel we recommend saving as ‘CSV UTF-8 (Comma delimited)’). You may name this file whatever you wish we suggest a name other than blank to avoid confusion with other templates.
Warning
Excel and other spreadsheet editors may overwrite information (such as dates) with formatting. This makes Excel notorious for use in bioinformatics. Double check that dates and other entries in your template are not accidentally edited by Excel. When editing, you may use the Formatting feature (Format menu > Cells) to ensure your sheet is entirely formatted as text
Tip
Tips for completing metadata templates
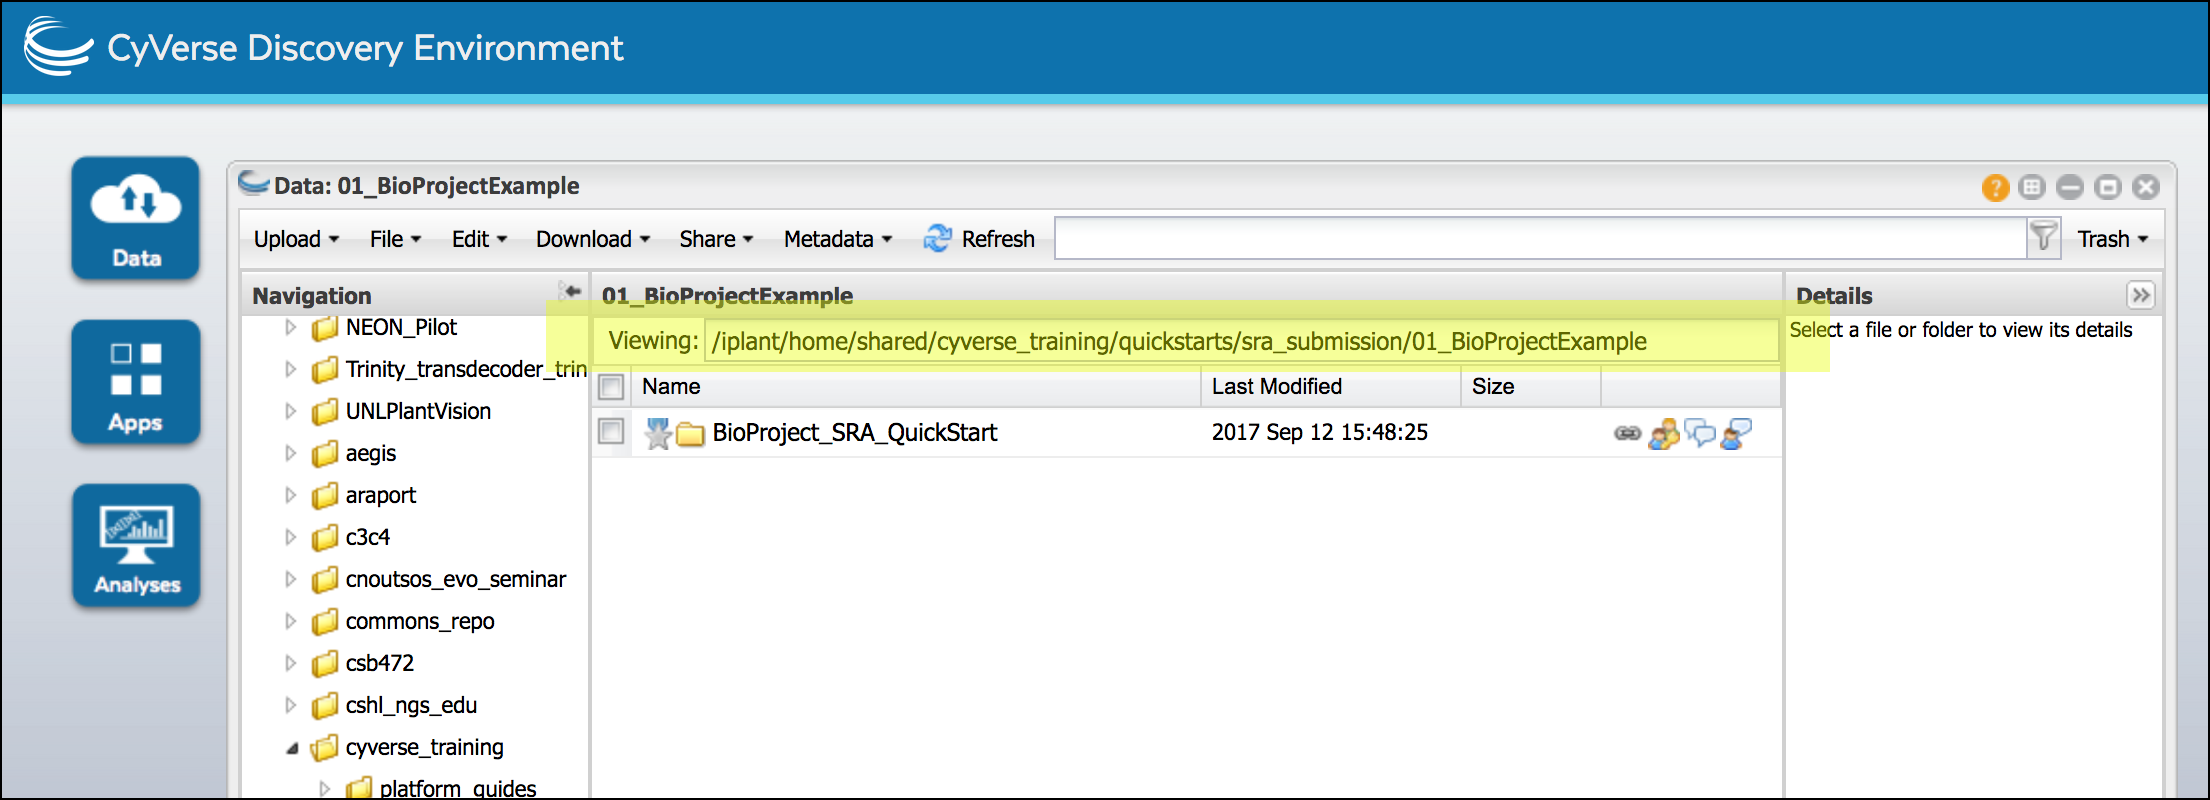
Completing the file name or path field The first column of CyVerse metadata templates is the ‘file name or path’ field. What should be entered is a path to the folder the metadata should be applied to. You can get this path from the Discovery Environment Data Window’s “Viewing:” field:
When copying your path ensure the name of your top-level BioProject folder is included
Following Guide Instructions
The guide gives additional information about the template including if a template feild is required, and if specific values (taken from controlled vocabulary) must be used. Something to remember include:
- If an items ‘required’ value is TRUE you must provide a value, or enter one of the following null values: ‘not collected’, ‘not applicable’, or ‘missing’.
- When prompted for an email address enter the address associated with your NCBI account. Notifications will only be sent to this address.
- The value type field indicates if the response is a single line of of alphanumeric characters (string), a multiline response, or an enumerated value (Enum). If a field must be an Enumerated Value (Enum) only use one of the terms specified in the guide
- Dates must be entered in the order specified by NCBI (e.g. Year-Month-Day)
Upload the completed template; from a Data window “Upload” menu chose ‘Simple Upload from Desktop’. You may upload to the same directory as your top-level BioProject folder, but do not place metadata files in your submission folders. (You may need to click “Refresh” to see the uploaded file)
Associate the metadata with your BioProject; in a Data Window, select your BioProject top-level folder. From the “Metadata” menu select ‘Apply Bulk Metadata’ and then ‘Select Metadata File’; select the uploaded metadata and browse to the uploaded file and click ‘OK’. You should get a notification that the metadata application was successful.
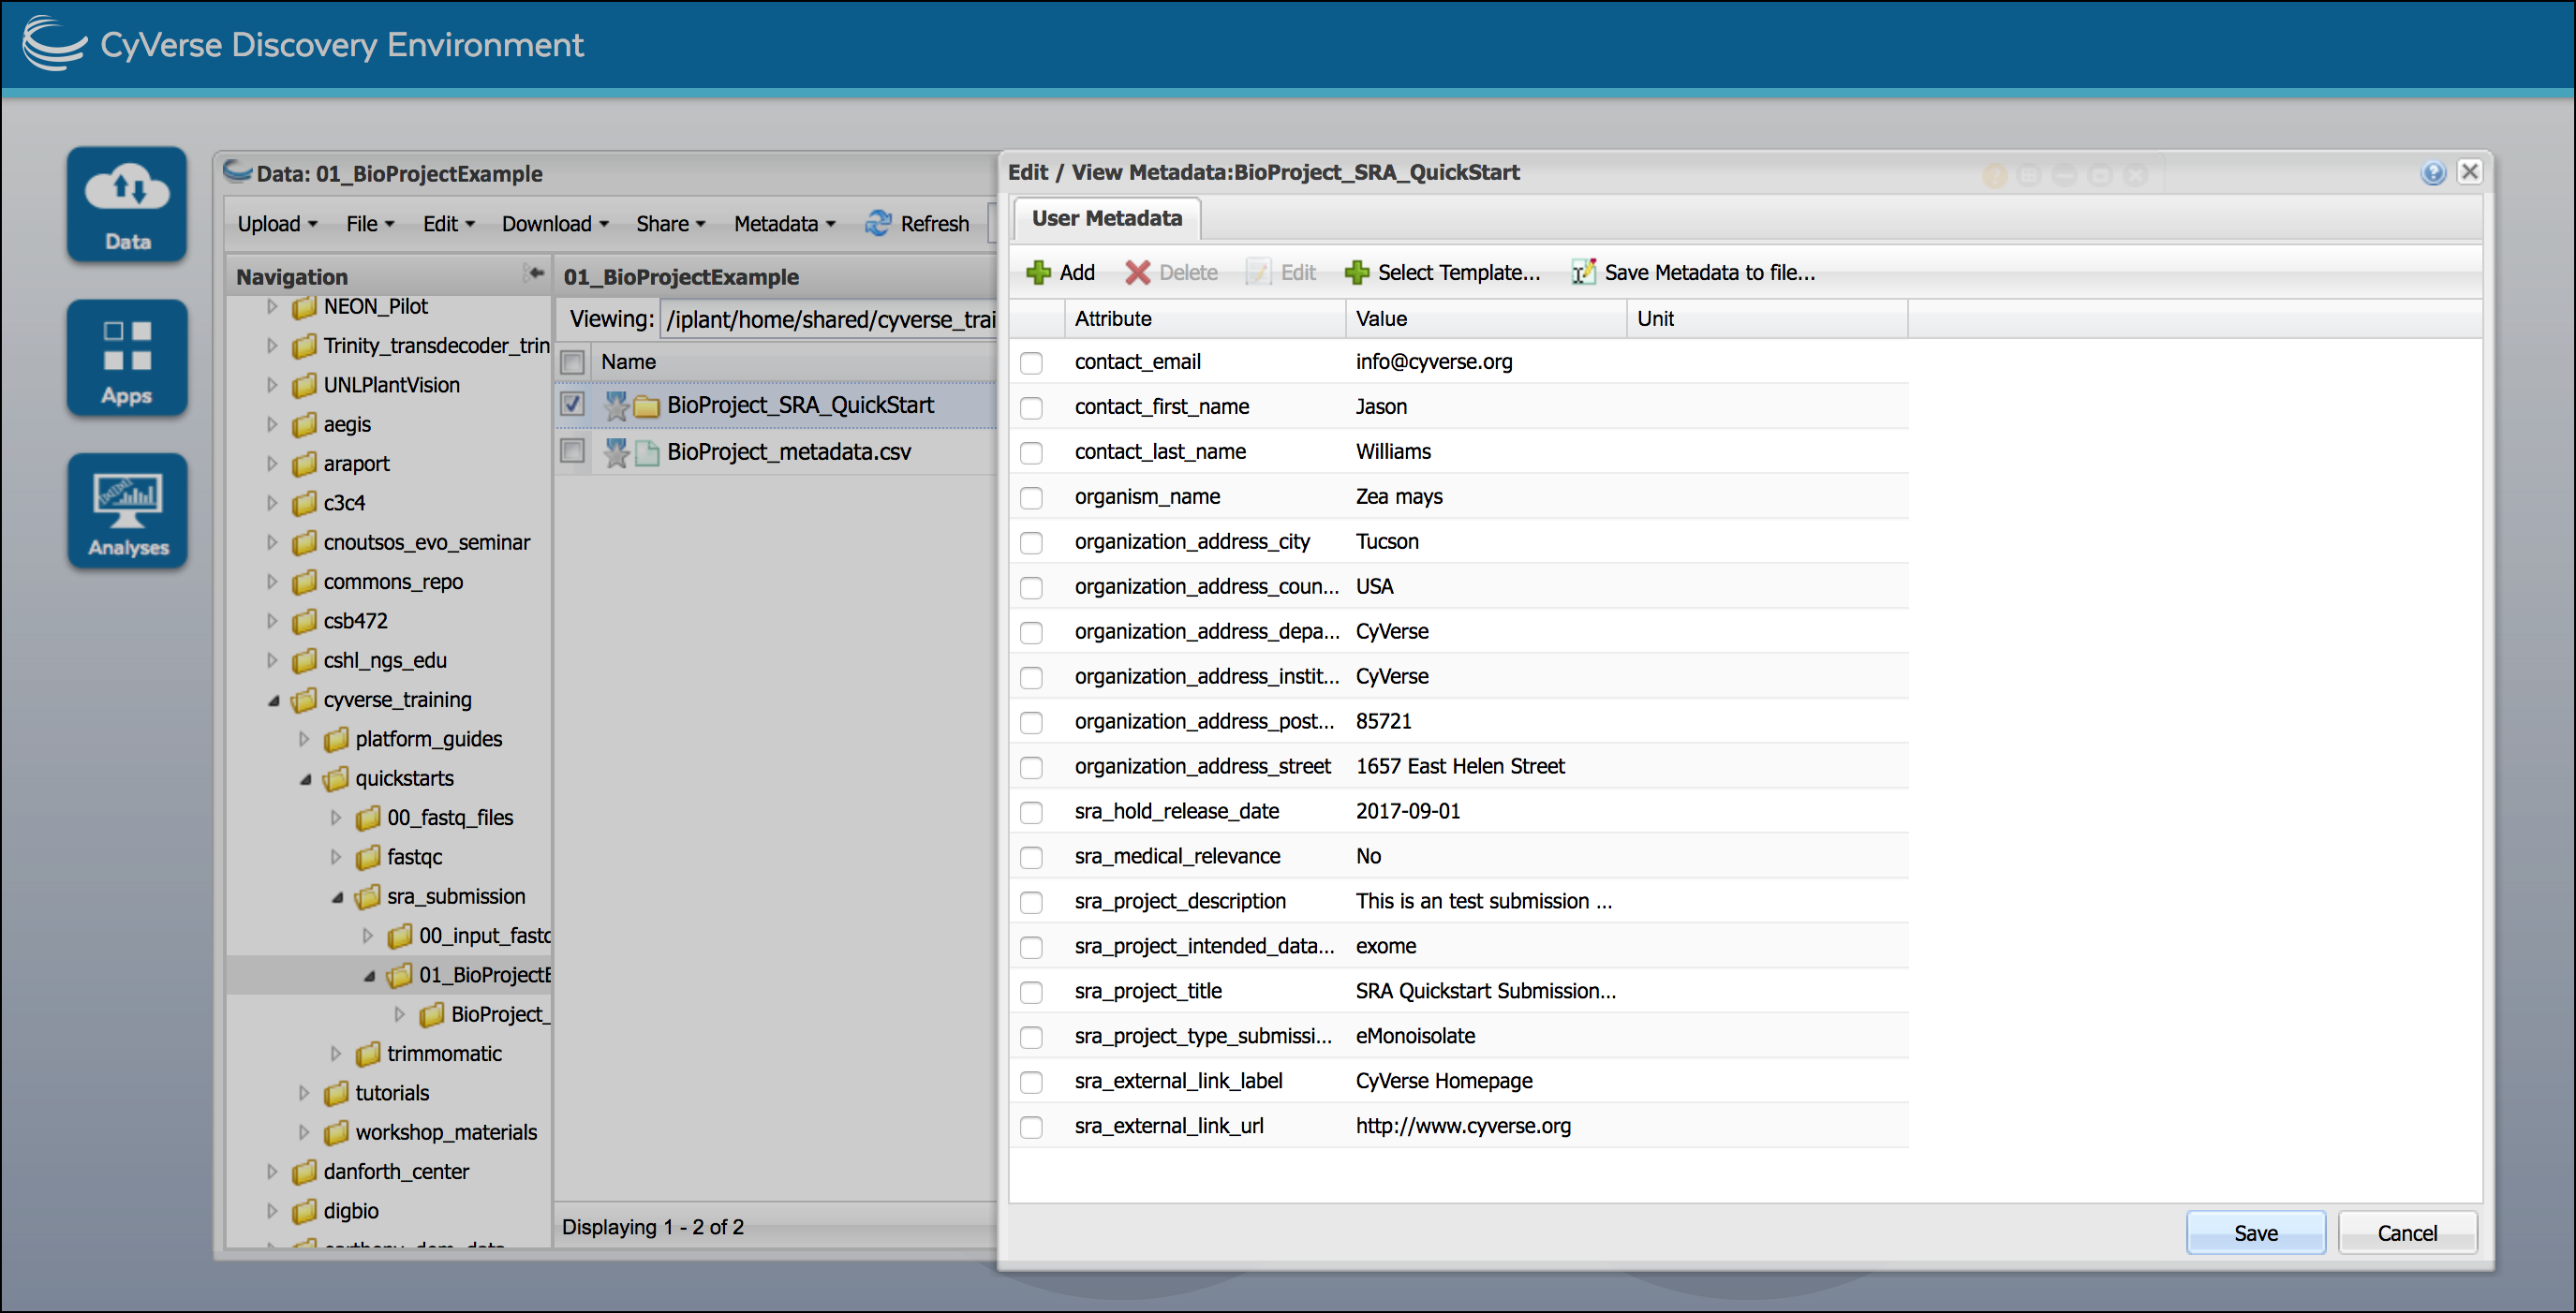
In a Data Window, select the BioProject folder and in the “Metadata” menu click ‘Edit/View Metadata’ to verify the metadata is applied and accurate.
II. Complete BioSample Metadata Template
You will next need to select the appropriate BioSample template (organism/sample specific) and apply this to all of your BioSample folders. Most of the information may be the same for each BioSample, with differences including things like treatments and/or tissue sources. You can view a completed example template here
If necessary, login to the CyVerse Discovery Environment
Click on Data to open a Data Window, and from the “Metadata” menu select ‘Download Template.’ Select and download the a “NCBI BioSample” appropriate for your submission. If you are unsure about which template to select; post a question to the CyVerse User Forum.
Complete the metadata template (See the warnings and tips in the BioProject Instructions above).
Important
You must complete a row of metadata for every BioProject folder. The metadata for all your BioSamples can remain in the same file, assuming that template is appropriate for all the BioSamples in your project. If you require more than one BioSample template, you will need to complete a separate template for each relevant BioSample.
Upload the completed template; from a Data window “Upload” menu chose ‘Simple Upload from Desktop’. You may upload to the same directory as your top-level BioProject folder, but do not place metadata files in your submission folders. (You may need to click “Refresh” to see the uploaded file)
Associate the metadata with your BioSample; in a Data Window, select your BioProject top-level folder. From the “Metadata” menu select ‘Apply Bulk Metadata’ and then ‘Select Metadata File’; select the uploaded metadata and browse to the uploaded file and click ‘OK’. You should get a notification that the metadata application was successful.
Tip
Although you select your BioProject folder, since your metadata template specifically indicates the path your BioSample folders, metadata will be applied to those subdirectories.
In a Data Window, select a BioSample folder and in the “Metadata” window click ‘Edit/View’ Metadata to verify the metadata is applied and accurate. Verify the metadata for each of your BioSamples.
III. Complete Library Metadata Template
This final template will need to be completed for every BioSampleLibrary folder. You can view a completed example template here
If necessary, login to the CyVerse Discovery Environment
Click on Data to open a Data Window, and from the “Metadata” menu select ‘Download Template.’ Select and download the a “NCBI SRA Library” template.
Complete the metadata template (See the warnings and tips in the BioProject Instructions above).
Important
You must complete a row of metadata for every BioSampleLibrary folder. The metadata for all your libraries can remain in the same file.
Upload the completed template; from a Data window “Upload” menu chose ‘Simple Upload from Desktop’. You may upload to the same directory as your top-level BioProject folder, but do not place metadata files in your submission folders. (You may need to click “Refresh” to see the uploaded file)
Associate the metadata with your BioSample; in a Data Window, select your BioProject top-level folder. From the “Metadata” menu select ‘Apply Bulk Metadata’ and then ‘Select Metadata File’; select the uploaded metadata and browse to the uploaded file and click ‘OK’. You should get a notification that the metadata application was successful.
Tip
Although you select your BioProject folder, since your metadata template specifically indicates the path your library folders, metadata will be applied to those subdirectories.
In a Data Window, select a BioSampleLibrary folder and in the “Metadata” window click ‘Edit/View’ Metadata to verify the metadata is applied and accurate. Verify the metadata for each of your BioSampleLibrary folders.
Warning
Once you have finished adding metadata to your submission folders, you cannot move or rename those folders without going back to edit the metadata entries.
IV. Generate summary metadata file
We will now generate a file that captures the metadata for the entire submission. In the next step, we will validate our results. You view an example of this file here
- If necessary, login to the CyVerse Discovery Environment
- Click on Data to open a Data Window, and select your top-level BioProject folder. From the “Metadata” menu, select ‘Save Metadata to file’; save the file with a descriptive name and a .xml ending (this make take a few minutes to generate; you may need to click “Refresh” to see the file).
Fix or improve this documentation
- On Github: Repo link
- Send feedback: Tutorials@CyVerse.org